Kya aap WordPress me post changes ka email notifications receive karna chahte hai. By default, WordPress kisi bhi user ke kiye gaye changes ka koi notifications send nahi karta hai. Agar aap ek multi-author WordPress site run kar rahe hai to aap apne website pe hone wale changes ke bare me informed rahna chahte hai. Is article me hum aapko batayenge ke aap apne WordPress email notifications kaise receive kare.
WordPress Me Post Changes Ke Liye Email Notifications Kaise Set Kare?
Agar aap akele apne WordPress site pe Work karte hai to ye aap ke liye bahut aasan hai ke aap apne website pe hone wale changes pe nazar rakh sake. Lekin agar aapke blog pe dusre author bhi likhte hai ya SEO specialists aapke blog post ko optimize karte hai to aapko un changes ko dekhte rahna hota hai jo wo log karte hai.
Example ke liye agar aap chahte hai ke aapke website pe koi post update ho ya phir kisi poorane post me changes kiye jaye to aapko alert mile.
Also Read: WordPress Se Custom Welcome Email Kaise Bheje ?
Ye aapke tamam team meber ko accountable banata hai. Agar kisi se bhi koi mistake hota hai to ise aasani se pakra aur theek kiya ja sakta hai.
To chalye dekhte hai ke WordPress me post changes email notifications receive kaise kare.
Yaha pe hum aapko do method batayenge, aapko jo bhi sahi lage aap us method ka use kare, Yaha pe hum aapko ye bhi batayenge ke aap apne changes ko undo kaise kare.
Method 1. WP Activity Log Ki Help Se WordPress Me Post Changes Notifications Kaise Set up Kare
Ye method sabhi WordPress user ke liye recommended hai kyuki ye method aasan, powerful, aur flexible hai.
Sab se pahle aapko WP Activity Log plugin ko install aur activate karna hoga. Zyada detail ke liye aap hamare plugin install karne ke guide WordPress Plugin Install kaise kare ko follow kar sakte hai.
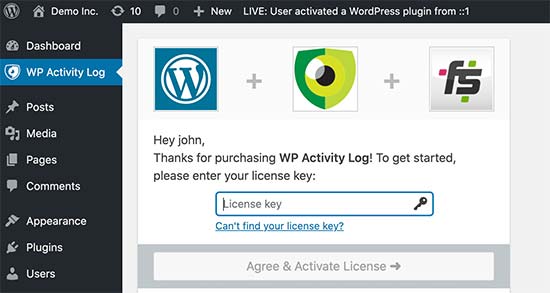
Activation pe aapse license key maanga jayega. Aapko ye information apne account me WP Activity Log website se mil jayega.
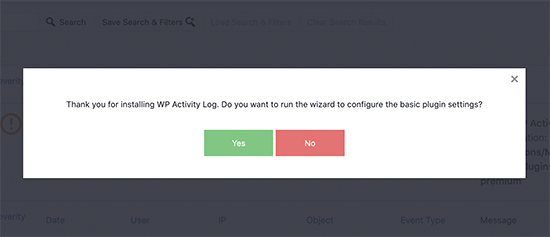
Uske baad aapko set up wizard run karne ka option diya jayega. Aap kuch quick questions ka answer de kar important monitoring aur logging features ko set up kar sakte hai. In tamam chizon ko aap baad me plugin settings me change kar sakte hai.
Phir aap WP Activity Log » Notifications page pe jaye aur Content Changes tab pe switch kare.
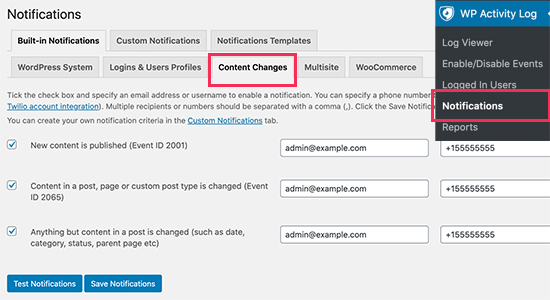
Yaha se aapko us event ko select karna hoga jo notifications ko trigger kar sake. Plugin three default notifications ke sath aata hai jo zyadatar content changes ko cover karta hai.
Har event ke liye aapko ek email address enter karna hoga jispe aapko notification bheja ja sake. Aapko yaha pe mobile phone number add karne ka bhi option dikhega taki aap apne post changes ka SMS notifications receive kar sake.
Apne changes ko sva karne ke liye aap Save notifications button pe click kare.
Post Changes Ke Liye WordPress Me SMS Notifications Setup Kaise kare
WP Activity Log post changes aur dusre WordPress activities Ke Liye SMS notifications set karna allow karta hai. Aisa karne ke liye aapko ek Twilio account aur phone number ki zaroorat hogi.
Twillio ek paid service hai jiski price SMS ke liye $0.0075 per SMS se start hoti hai. Aapko ek virtual phone number bhi purchase karna hoga taki use message send karne ke liye use kiya ja sake.
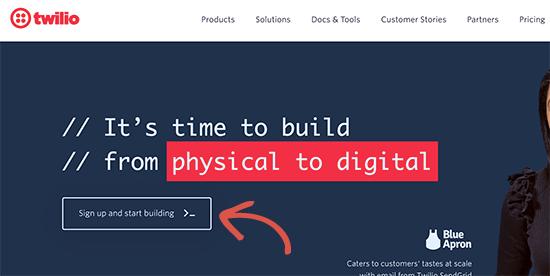
Simply Twillio website pe jaye aur free trial account ke liye signup kare.
Account ko setup karne ke baad aap Twillio dashboard pe pahunch jayega jaha pe aap apne Account SID Auth Token, ko copy kar sakte hai aur ek trial phone number le sakte hai.
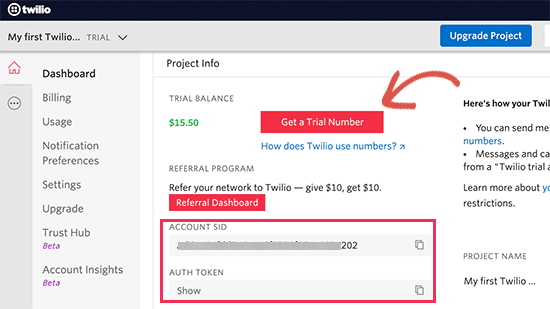
Text editor me is value ko copy aur paste kare aur browser tab ko open rahne de.
Ab WordPress website admin area me phir se WP Activitiy Log » Settings page pe jaye. Yaha se SMS Provider tab me switch kare aur Twilio credentials enter kare.
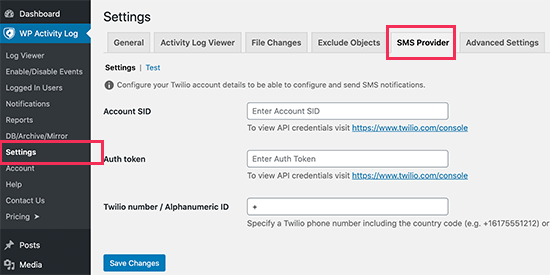
Apne settings ko store karne ke liye save changes button pe click kare.
WP Activity Log Ke Post Changes Notifications Ko Test Kare
WP Activity Log aapko post change notifications ko easily test karna allow karta hai. Simply WP Activity Log » Notifications page pe wapis jaye aur ‘Content Changes’ tab pe switch kare.
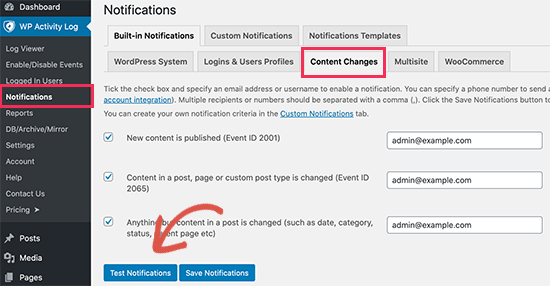
Niche scroll kare aur ‘Test Notifications’ button pe click kare. Ye popup window open karega jisme aap notification send karne ke liye email address aur mobile phone number enter kar sakte hai.
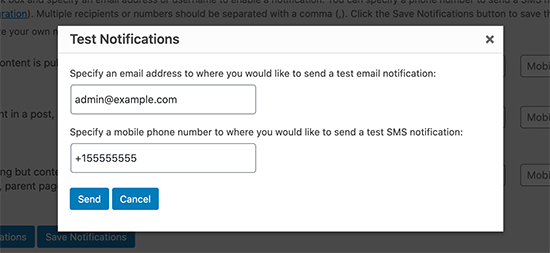
WP Activity Log test notifications send kar dega.
Agar aap SMS notifications receive nahi karte hai to apne Twilio credentials ko check kare ke correct hai.
Method 2. Better WordPress Notifications Ki Help Se Post Changes Ke Liye Email Notifications Send Kare
Ye method use karne me aasan hai lekin ye ready-made template ke sath nahi aata hai. Halaki ye method aapko post changes ka email notification send karna allow karta hai lekin is method me aapko email khud likhna hoga aur activity ko khud hi investigate karna hoga.
Sab se pahle aapko Better Notifications for WordPress plugin ko install aur activate karna hoga. Zyada detail ke liye aap hamare plugin install karne ke guide WordPress Plugin Install kaise kare ko follow kar sakte hai.
Activate hone pe Notifications » Add New page pe jakar apna first custom notification create kare.
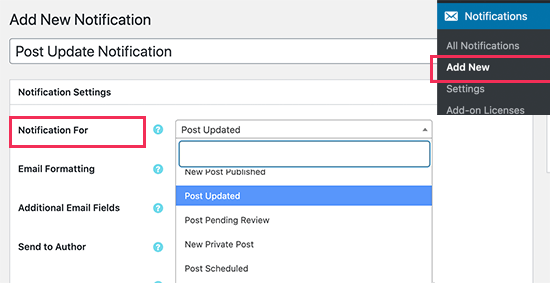
Pahle aap apne notification ka title provide kare. Uske baad ‘Notification for’ option ko choose kare joki event hoga jiske liye notification ja raha hai.
Example ke liye jaise humne is notification ke liye ‘Post Updated’ choose kiya hai.
Iske baad aap email options ko set kare jaise from, cc, sender email. Aap use skip kar sakte hai aur plugin aapke default WordPress email settings ko use kar lega.
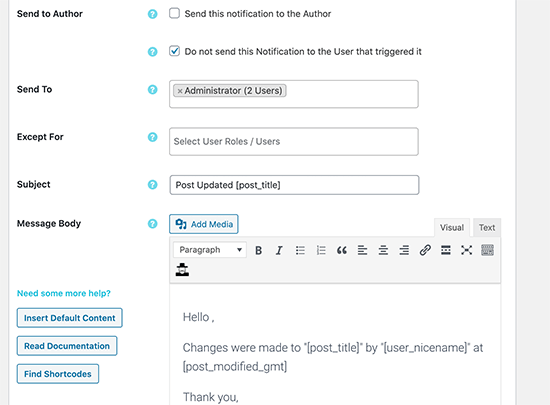
Iske baad aapko un user ya user role ko select karna hoga jo ‘Send to’ option ke zarye is notification ko receive karenge. Uske niche aap email subject aur message khud likh sakte hai.
WP ke liye Better Notifications post changes ke template ke sath nahi aata hai. Iska matla ye hai ke aapko khud ka email message likhna hoga.
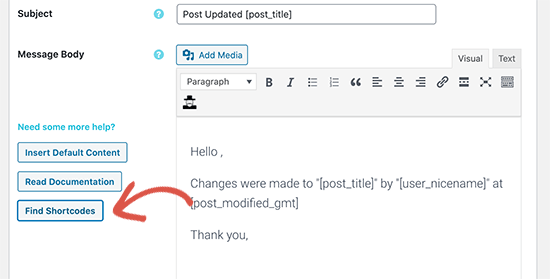
Plugin kuch shortcode ke sath aata hai jise aap use kar sakte hai. Aap ‘Find shortcodes’ button pe click kar ke un sabhi ko dekh sakte hai.
Last me Save button pe click kar ke aap email notification ko save kar sakte hai. Uske baad ‘Send Me a Test Email’ button pe click kar ke dekh sakte hai ke ye work kar raha hai ke nahi.
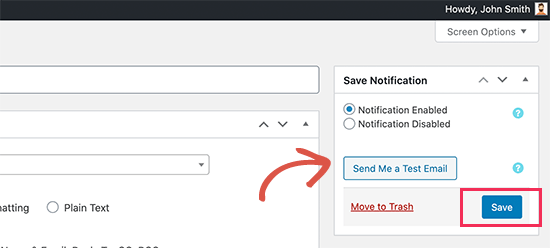
Better Notification for WordPress ek activity monitoring plugin nahi hai. Iska matlab hai ke aapko multiple notifications ko set up karna hoga taki ye WordPress me different types ke content changes ko cover kar sake.
Ye aapko custom notifications create karne aur default WordPress notifications ko modify karne ke liye allow karta hai.
WordPress Me Post Changes Ko Revise and Undo Kaise Kare
Jub aap post changes ke liye email notification receive karte hai to aap ye dekhna chhate hai ke kya changes kiye gaye hai, unhe kisne aur kab kiya hai.
WordPress built-in revision management system ke sath aata hai jo sabhi articles pe hone wale changes ko track karta hai.
Simply us post ya page ko edit kare jise aap review karna chahte hai aur phir right-column se ‘Post’ settings me ‘Revisions’ tab pe click kare.
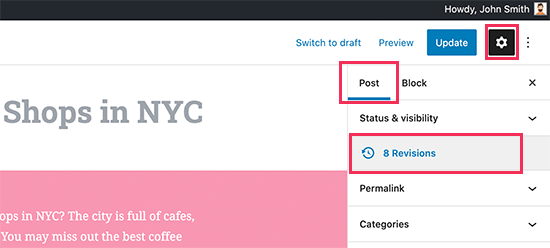
Ye aapko post revisions screen pe le jayega. Jaha pe aap ‘Compare two revisions’ box ko check kar sakte hai aur phir compare the changes ke niche slider ko move kare.
Niche scroll kare aur aapko revision ke baach ka changes red aur green colors me highlighted dikh jayega. Aga aapko changes pasand nahi aaye to aap ‘Restore revision’ button pe click kar ke changes ko undo kar kr previous version ko restore kar sakte hai.
By default, WordPress email send karne ke liye PHP mail() function ka use karta hai. Ye method proper authentication ka use nahi karta hai jiska matlab hai ki iska aasani se missuse kiya ja sakta hai.
Yahi wajah hai ke bahut sare spam filters is tarah ke email ko spam mark kar dete hai ya phir block kar dete hai. Isliye aisa na hone ke liye aapko proper SMTP service provider ko use karna chahye.
Ummid hai aapko WordPress email notifications receive karne ka ye article (WordPress email notifications kaise receive kare) informative laga hoga. Agar aapka koi swaal hai to aap humse comment section me pooch sakte hain. Apke liye ye (WordPress in Hindi) course design kiya gya hai, Is Website pe apko WordPress Complete Course Hindi me mil jyega, Agr aap WordPress se related videos dekhna chahte hain to aap hmare WP Seekho YouTube Channel par bhi visit kar sakte hai.